Beginner Guide for Bluehost:How to install wordpress in Bluehost cpanel?

If
you are searching to create a new website, you will first want to buy web hosting for your site. At web-hosting area, we advocate the use of Bluehost due to its low prices, equipment and features, and beginner-friendly
experience. In this guide, we’ll exhibit to you how to deploy WordPress on Bluehost and get begun with your new website.
Here’s what we’ll cowl – you can click on to leap straight to a unique section:

Let’s get started…

How to sign up with Bluehost

Here’s it shows how to get up and running with your Bluehost account…
1. Choose a hosting plan Recommendation
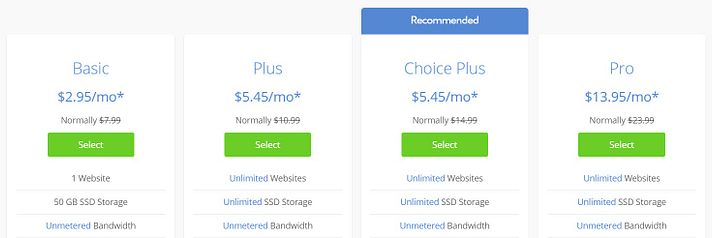
The first step to check your needs to select a hosting plan. Bluehost offers a range of hosting options including…
If you’re not sure which plan is best for you, we recommend starting with the cheap shared hosting plan, which starts at just $2.95 a month.
Here is some further reading to help you choose the right hosting plan for your project…
2. Create a new domain name
With all the Bluehost plans, you get a free domain name for the first year.
Once you have selected your hosting plan, select Create a New Domain to choose your free domain name.
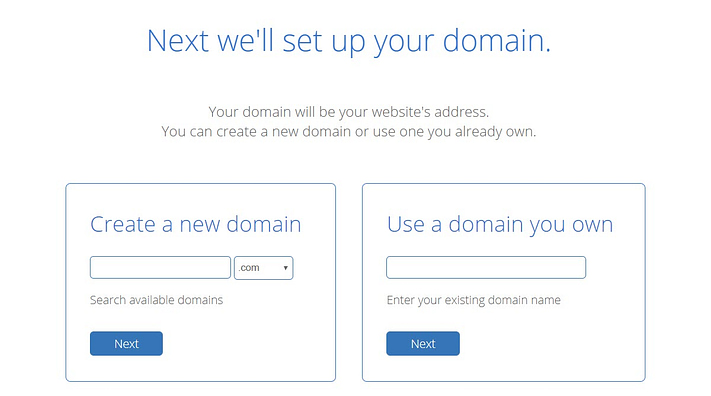 |
Type your chosen area identify into the area search, and Bluehost will then show a listing of handy area extensions or comparable accessible area names.
(If you have registered an area with a third-party area registrar then you can use this area to identify alternatively of developing a new one with Bluehost. To do this, you will want to factor your area identify to Bluehost’s nameservers – a method that Bluehost can stroll you through).
To assist with deciding on the proper area identity for your new website, take a look at these articles…
3. Enter Bluehost account details

Next,in Bluhost you need to fill the personal information to create your account. Or, you can sign in with Google to speed up this process.
4. Confirm hosting plan details
Bluehost will now show your plan details. Check them carefully, as with the aid of default Bluehost provides various top premium ‘extras’. These include…
- Domain Privacy Protection (from $11.88 a year)
- SiteLock Security (from $23.88 a year)
- CodeGuard Basic (from $2.99 a month)
- Bluehost SEO Tools (from $23.88 a year)
Unless you already are aware that you want a specific service, we’d propose de-selecting all of these add-ons. None of them are necessary and you can constantly add them later if needed:

Under Account Plan, you can additionally set the range of years you favor to signal up to Bluehost for. The minimal dedication is 12 months, however, you can get a better bargain if you commit to more than one year up front.
5. Enter your payment details
The last step in the Bluehost sign-up process is to enter your payment details and confirm the selected order.

Remember, Bluehost gives a 30-day money-back guarantee, so if you are sad with your layout or the internet hosting carrier after purchase, then you can ask for a refund.
Bluehost will now go in advance and set up your new internet hosting graph and area name. You will then acquire an e mail with charge affirmation as properly as your new account information, consisting of login and password details.
How to install WordPress on Bluehost
Once you’ve purchased your hosting service plan, you next need to install WordPress on Bluehost. Again, this is an enormously quick and convenient process, helped via Bluehost’s user-friendly interface and its one-click WordPress install feature.
1. Log in to Bluehost
To get started:
- Log in to your new Bluehost account.
- Go to the My Sites tab.
- Click the Create Site button in the top-right corner.

2. Enter your website information
Next, you want to enter some primary statistics about your website, along with the Site Name and Site Tagline. Don’t stress too much – you can always change these later:

3. Choose your domain name
Use the Domain drop-down to select the domain name that you chose when you created your Bluehost account.

You can also choose whether or not to install some of Bluehost’s recommended plugins.
4. Click “Next” to install WordPress on Bluehost
Bluehost will now install WordPress in the website, creating your new WordPress website, and displaying your log-in details.

To open your new WordPress website, click the Login to WordPress link.
How to set up your new WordPress website with the tools of Bluehost.
First, we need to notice that you don’t always want to observe the steps in this section. It’s absolutely viable to make your own website the usage of the everyday WordPress dashboard.
However, if you’re no longer positive about the place to start, Bluehost provides its personal dashboard in the Bluehost area of your WordPress dashboard that can assist you get up and running with your site.

In the Bluehost area, you can…
- Add new pages and posts
- Manage your menus
- Create an eCommerce Store with WooCommerce
- Create a staging environment to test your website
- Disable the Bluehost ‘Coming Soon’ page and launch your website
Most of these are core WordPress points – simply put collectively in one handy spot for you to access.
The Bluehost dashboard is a particularly beneficial device for these new to WordPress, and who may also want some route on how to get started. Here’s how to use it…
1. Use the Quick Launch Wizard
When you open your WordPress dashboard, you need to see the Bluehost Quick Launch Wizard.

Using the Quick Launch Wizard is a wonderful way to get your internet site started. Follow the directions in the wizard to set up the Jetpack plugin, a contact structure with WPForms Lite, and caching for your website. Let’s take a nearer seem at these features…
Jetpack – A multi-functional plugin, Jetpack will add assistance to beautify the safety and overall performance of your website, as nicely as supply social media features, analytical facts about how your target market is behaving on your site, and lots more. The Bluehost Wizard will assist you rapidly join to WordPress.com to get entry to and spark off these superb Jetpack modules.
Contact Form – Every internet site wishes a contact shape to allow your target audience to join with you and assist you to make bigger lead generation. The Quick Launch Wizard allows you to at once set up a contact structure for your internet site with the usage of the free WP Forms Lite plugin.
Caching – Bluehost offers a built-in caching feature. When you spark off this tool, your internet site will load faster, which is vital for consumer ride and SEO.
2. Choose the WordPress theme
Your WordPress theme controls how your site looks.
Selecting the right WordPress theme is an important task, and can take time as there are so many to choose from.
One of the elements discovered inside the Bluehost Menu is a Marketplace containing top-class WordPress themes. You can browse these, however you additionally shouldn’t experience confined to simply the determination in here…
There are lots of free and top rate WordPress subject matters on hand backyard the Bluehost Marketplace, so we advocate looking at these choices earlier than making a decision.
Our free Hestia theme is a modern, high-performance one-page theme, ideal for any kind of commercial enterprise and a top-notch alternative to get you to begin.

You can additionally locate different top rate issues past these in the Bluehost Marketplace. To locate a fashionable top-class theme that fantastic matches your project, test out these theme stores and developers…
3. Install some essential WordPress plugins
When Bluehost installs WordPress, it also installs a selection of WordPress plugins by default.
 after you install WordPress on Bluehost")
These include…
- Akismet Anti-Spam
- MonsterInsights, a Google Analytics plugin
- Jetpack
- WP Forms Lite
You can, of course, delete any of these plugins, or install your own plugins. Here are a few essential plugins that we recommend…
- Yoast SEO – Improve your site’s SEO and help your pages and posts to rank in the search engines.
- Wordfence Security – Keep your site safe and secure with this free security plugin that includes an endpoint firewall and malware scanner.
- UpdraftPlus – For peace of mind, keep your website backed up, so if your site is hacked you can quickly restore it to its original glory.
4. Create pages (and posts)
The subsequent step is to create the content material for your website – begin via including the pages. To do so, within your WordPress dashboard, click on Bluehost Menu. Then below Content > Pages, select Add New Page.

Homepage – This is the place most of your target market will land when they go to your site. Use effective imagery, signpost essential content, and add calls to action, to make certain your homepage captures and engages your visitors.
About web page – An vital page, right here you ought to share your story, talk about your business’ philosophy, introduce your team, and add any different applicable records that will assist you to construct a relationship with your audience.
Contact web page – As properly as a contact form, reflect on consideration on exhibiting opening times, a map displaying location, social media links, and more.
Portfolio – If appropriate, developing lovely portfolio pages will assist to show off your work.
Blog – Always reflect on consideration on including a weblog to your website. A weblog will entice site visitors to your site, hold your internet site updated, and assist with SEO.5. Launch your website

Once you have created your content material and personalized the look of your website, all that is left to do is launch your website.
Bluehost offers a ‘Coming Soon’ page, that prompts through default when you install WordPress. This web page offers you the privateness you want to work on your website.
When you’re geared up to launch, click on the Launch your website button in the Bluehost WordPress dashboard to go live.
That’s how to install WordPress on Bluehost
Conclusion:Here explained in this article clearly about wordpress installation in Bluehost
Do you have any questions about how to install WordPress on Bluehost and launch your site? Ask away in the comments!


Besides pricing, both best webhosting companies have the same features. While Bluehost has a lower price, HostGator has a higher uptime rate.
ReplyDelete